Our heroes approached the Well of Dragons for the finale of our campaign. Naturally, with the overt acceleration of events leading up to this moment, a monumental dungeon crawl isn’t what my table is looking for as they arrive at the caldera. They’re ready to begin the ultimate battle to decide the fate of Faerun!
The unfortunate truth is I haven’t run this dungeon either time I’ve finished this module. Back in 2015, my players opted to crash Skyreach Castle into the mountainside and skipped it that way; this time, I never planned to run it. At a different table with a different DM behind the screen, I’m sure a final crawl is exactly what the moment calls for. It just hasn’t been the case for me running this module.
Instead, the players were given the opportunity to decide where their allied forces would be deployed, then we were right into the Caldera.
Phase 1: The Ritual
A Clash of Legends
Our heroes arrived during the final moments of the ritual. Right at the top, I had a volunteer roll 1d4 and subtracted the result from 10. This number gave us how many rounds the party had to accomplish their goals: disrupt the ritual, clear the field, and prepare to battle Tiamat. A few specific goals with defined effects on Phase 2 were given to them, but more on that later.
The party was also accompanied by a handful of allies I had the players pilot in the battle: Brok Stonebrow, Cyanwrath, Maccath the Crimson, and an aarakocra rogue our Owlin Ranger PC was romancing. This evened out the field against a truly incredible number of opponents within the caldera.
Lastly, this battle was joined by several villainous characters who would all have Legendary Actions if encountered alone. Running all these foes with that resource at their full disposal would’ve been keenly unfair. (“Alright, at the end of your turn, the party is struck with three Fireballs. Dex saves, please.” No.) Plus, the heroes are legendary themselves at this point! They’re battling to determine the fate of the very world! If that isn’t the stuff of legends, I’m not sure what is.
So here’s what I did instead. At the beginning of each round, I had a volunteer roll 1d4, and we subtracted that result from 10. The villains had a shared pool of Legendary Actions that they could use at the end of a heroes’ turn as normal equal to the sum of the equation, while the players gained the number they rolled as a shared resource of Heroic Legendary Actions they could take at the end of an enemy’s turn. Then, any creature that took a legendary action that round couldn’t take another until the beginning of the next round. For instance, in the first round a player rolled a 3 on that d4, gaining them 3 legendary actions and setting the villainous pool to 7. At the end of a player’s turn, Rath Modar could spend 3 of the villain’s pool of Legendary Actions to cast a Fireball at the party, leaving 4 in the pool for the villains for the rest of the round. Then, at the end of any villain or minion’s turns, the heroes could use one of their pooled Legendary Actions to do one of the following:
- Take a Dash action
- Make one weapon attack
- Cast one cantrip
This gave the battle a sense of momentum, too. Sometimes, our heroes were ascendant and active; other times, the villains were in power and striking back with all that they could muster.
Speaking of the villains …
The Roster
In addition to a smattering of minions at each altar, the potent enemies our heroes faced were as follows. Each had their own suite of Legendary Action options and priorities during the battle.
- Rath Modar and his simulacra could Cast a Cantrip (Cost 1), Cast a Chromatic Orb (Cost 2), or Cast Fireball (Cost 3).
- Serevin Silrajin could Cast a Cantrip (Cost 1), or Cast Magic Missile (Cost 1). (I let him do the latter because I gave him a Staff of the Magi.)
- Talis the White could Cast a Cantrip (Cost 1) or Reduce a Creature’s Speed by half (Cost 2).
- Iskander the Blue could Cast a Cantrip (Cost 1) or Cast Lightning Bolt (Cost 3).
- Naergoth Bladelord could Make a Weapon Attack (Cost 1), Make a Shove Attack (Cost 1), or Disengage and Dash (Cost 1).
- And finally, Serevin’s young red dragon Seladrius could Move up to half his speed and make 1 Rend attack (Cost 1) or Cast Scorching Ray at 3rd level (Cost 1).
A few of these creatures were additionally under a handful of effects for mobility purposes from items or spells. Rath Modar had one of his simulacra concentrating on a Fly spell for the three of them, whereas Serevin wore an Amulet of Levitation.
Finally, each minion group acted simultaneously, but only the ones disturbed from their ritual opposed the heroes. These groups were the Red Wizards of Thay, Clerics of the Profane Dragonflame, Cultist Guardians, Cultist Talonblades, Hellhounds, additional abishai, and a second young dragon (green).
The Map
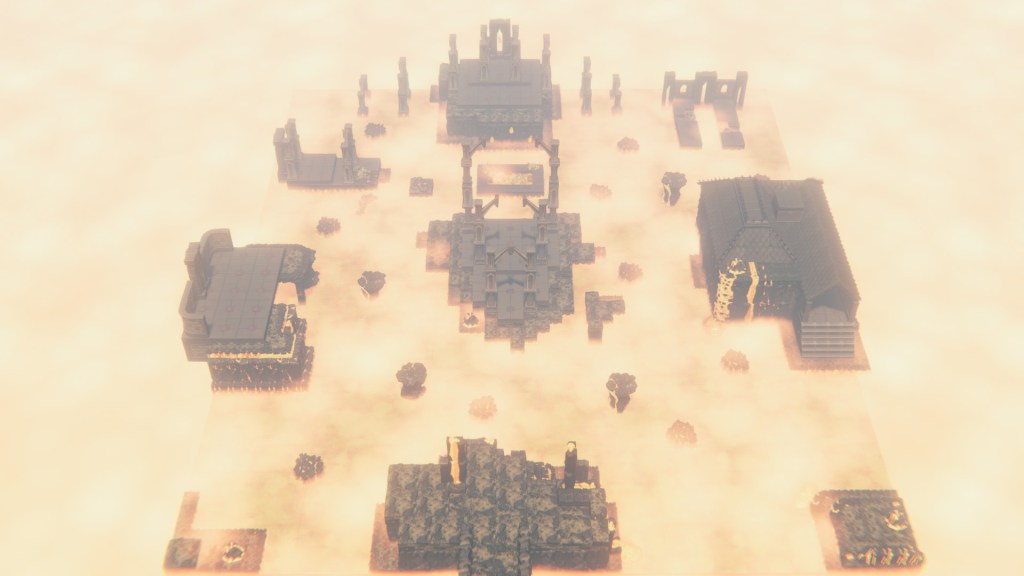
The caldera as it exists in the module looked like it would be annoying to recreate in Talespire (though this user on Talestavern seems to have done a good job of it!), so I decided to make my own alternative inspired by the one in the book.
I imagined structures from Tiamat’s Temple in Avernus were being pulled through by the ritual, and if it was successful, the deity’s seat would exist wholly within the Well of Dragons. Between these structures was a lake of lava, proving to be an exciting hazard for my players to overcome and employ! Several cultists ended up taking a dunk before too long. But they say a picture is worth a thousand words, so here’s an angled overhead screenshot of the map. I’ve additionally uploaded it to Talestavern here should you decide you’d like to use it on the VTT yourself!
Phase 2: Tiamat
The Goals
When I ran this module before, when Tiamat arrived on the field, she went down a little too easily. My players at the time had accomplished many of the things that would weaken her before even arriving to the ritual, and her taking the field didn’t redefine the battlefield in the way that I believe a summoned god should. So, I reworked Tiamat’s statblock and made the party fight for each and every step to weaken Tiamat. In the first phase of the encounter, they had a number of specific goals to attain.
First, for each round the party dimmed two or more altars (present at the outlying five islands on the map), Tiamat’s total hit points were reduced by 25. (Each platform had 3 spell casters concentrating on the ritual; if at least two of them lost concentration, the altar dimmed.) My heroes successfully dimmed two or more altars on five rounds, reducing Tiamat’s health by 125 points (down from 1025 to 900).
Next, if all five shrines were dimmed during a single round, Tiamat’s Limited Spell Immunity trait was removed. With the use of Dimension Door and the party’s fighter proving very adept at pushing channelers into the lava, the party accomplished this on one of the final rounds of the battle.
Lastly, removing the Mask of the Dragon from the ritual site would reduce the number of Legendary Actions Tiamat could take per round by 2 (from 5 to 3). The aarakocra rogue NPC managed to pull this off just before the ritual completed.
Additionally, my party successfully cleared the field of all the major and minor threats. It would be them and their allies against Tiamat alone.
The Goddess
Even with their great success in the first phase of the battle, Tiamat proved her strength all the same. With access to three casts of Divine Word per day, Tiamat managed to get a few of the NPC allies in the battle low, then speak a single word to slay them and remove them from the fight. Maccath and Brok were both killed outright; Cyanwrath was blinded and deafened, and the PCs fought hard to keep themselves above the threshold of the spell’s worst effects. They effectively spread out to avoid being multi-targeted by the breath weapon attacks, and overcame the goddess with a satisfying final blow from the draconic lineage sorcerer.
However, her defeat was not the end of danger! With the goddess sent screaming back into Avernus, the caldera began to rumble violently. Our heroes collected their fallen allies and fled as fast as they could, arriving on the mountainside. With no good path down the mountain and the inability to carry their fallen comrades all the way, they cast Revivify on Brok and Maccath, and Maccath Teleported them to Skyreach castle to escape the volcano’s eruption!
What followed afterward was the epilogue of our adventure; one which will remain the tale of the table alone.
As always, thank you for reading. Thank you for joining me on the adventure of retelling my experiences running this module. I hope you have something to take away from this series: either for your own run of the module or for your own campaigns. In the end, this finale was immense. The first phase of the battle straddled two sessions of our game, with Tiamat’s defeat and our epilogue filling the final session.
For those of you who’ve enjoyed the little snippets of this series as it alluded to the campaign I ran, I may begin working on a campaign diary style series to continue to explore ideas and lessons learned from running my games. After all, we can always improve.
As to other module reworks, I’ve not run too many other full campaign books. I had the benefit of playing in a complete run of Rime of the Frost Maiden, and a friend of mine hopes to run Curse of Strahd in the future, but I’ve seldom been short on ideas myself. I am presently running through the Delian Tomb to learn Draw Steel with my friends; perhaps I’ll have some thoughts as we approach the conclusion of that short adventure.
Regardless, good luck out there heroes. See you again soon.